Setting Up Web Project using Next.js, Tailwind and Storybook
Next.js and Tailwind are popular frameworks in modern web development. I’ve used them in some projects and really happy with the result. Storybook is one library to create component documentation which can be integrated to project written in many UI libraries. It provides many functionalities to enhance our documentation. Let’s try to combine these libraries to set up our next web project.
Setup Next.js
First of all, let’s initiate the project using Next.js:
- Initiate project and name it as you want
npx create-next-app@latest --typescriptWe will use TypeScript for the rest of article. More setup options visit Next.js documentation.
- Go to the project directory, then install additional ESLint plugins
yarn add -D @typescript-eslint/eslint-plugin @typescript-eslint/parser eslint-plugin-simple-import-sort - Update
.eslintrc.json{ "extends": ["next/core-web-vitals", "plugin:@typescript-eslint/recommended"], "plugins": ["@typescript-eslint", "simple-import-sort"], "overrides": [ { "files": ["**/*.js"], "rules": { "@typescript-eslint/no-var-requires": "off" } } ], "rules": { "@typescript-eslint/comma-dangle": ["error", "always-multiline"], "@typescript-eslint/member-delimiter-style": [ "error", { "multiline": { "delimiter": "semi", "requireLast": true }, "singleline": { "delimiter": "semi", "requireLast": false } } ], "@typescript-eslint/no-shadow": "error", "@typescript-eslint/semi": "error", "import/newline-after-import": "error", "import/no-duplicates": "error", "no-console": "warn", "no-multi-spaces": [ "error", { "ignoreEOLComments": true, "exceptions": { "VariableDeclarator": true } } ], "no-multiple-empty-lines": [ "error", { "max": 1, "maxBOF": 0, "maxEOF": 0 } ], "no-trailing-spaces": "error", "quotes": ["error", "single", { "avoidEscape": true }], "react/jsx-curly-brace-presence": [ "error", { "props": "never", "children": "never" } ], "react/jsx-sort-props": "error", "simple-import-sort/imports": [ "error", { "groups": [ // Custom grouping: https://github.com/lydell/eslint-plugin-simple-import-sort#custom-grouping // Side effect imports. ["^\\u0000"], // Node.js builtins prefixed with `node:`. ["^node:"], // `react` and `next` related packages. ["^react", "^next"], // Packages // Things that start with a letter (or digit or underscore), or `@` followed by a letter. ["^@?\\w"], // Absolute imports for internal dependencies. ["^components", "^core", "^hooks", "^providers", "^utils"], // Anything not matched in another group. ["^"], // Relative imports. Anything that starts with a dot. ["^\\."] ] } ], "simple-import-sort/exports": "error" } } - Install
prettieryarn add --dev --exact prettier - Add
.prettierrc.jsmodule.exports = { singleQuote: true, trailingComma: 'all', }; - Add
.prettierignore# next.js /.next/ /out/ # production /build - Add
prettierscript topackage.json{ "scripts": { ... "format": "prettier --write", ... } } - Try running the dev server
yarn devBy default, Next.js runs on
http://localhost:3000.
Integrate Tailwind into Next.js
Tailwind provides a comprehensive guideline for many frameworks. Here’s to install Tailwind into Next.js.
- Install dependencies
yarn add -D tailwindcss postcss autoprefixer
npx tailwindcss init -p
This step generates
tailwind.config.jsandpostcss.config.js. - Update
tailwind.config.jswith the following content:/** @type {import('tailwindcss').Config} */ module.exports = { content: [ './components/**/*.{js,ts,jsx,tsx}', './pages/**/*.{js,ts,jsx,tsx}', ], theme: { extend: {}, }, plugins: [], } - Replace the content of
styles/global.csswith Tailwind directives@tailwind base; @tailwind components; @tailwind utilities; - Install additional libraries for Tailwind
yarn add -D @tailwindcss/nesting prettier-plugin-tailwindcssVisit nesting and prettier plugin documentation for more information.
- Update
postcss.config.jsmodule.exports = { plugins: { 'tailwindcss/nesting': {}, tailwindcss: {}, autoprefixer: {}, }, }; - Update
.prettierrc.jsmodule.exports = { singleQuote: true, trailingComma: 'all', plugins: [require('prettier-plugin-tailwindcss')], }; - Start using Tailwind in
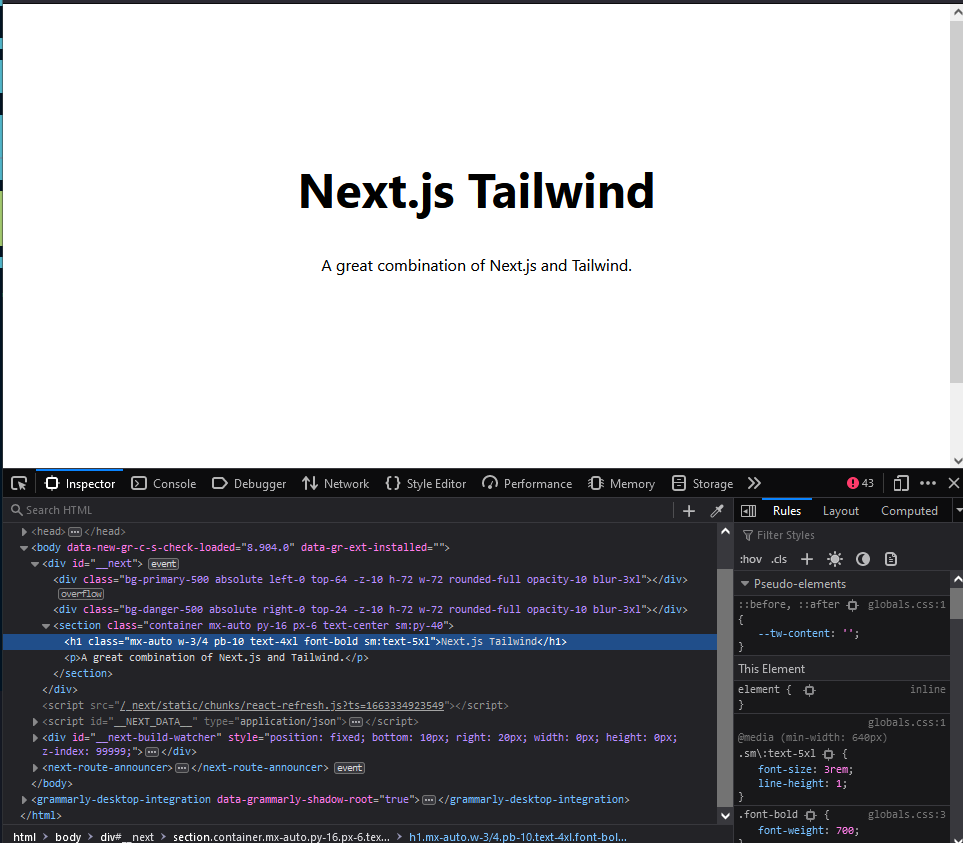
pages/index.tsximport type { NextPage } from "next"; import Head from "next/head"; const Home: NextPage = () => { return ( <> <Head> <title>Next.js Tailwind</title> <meta name="description" content="Generated by create next app" /> <link rel="icon" href="/favicon.ico" /> </Head> <div className="absolute left-0 top-64 -z-10 h-72 w-72 rounded-full bg-primary-500 opacity-10 blur-3xl"></div> <div className="absolute right-0 top-24 -z-10 h-72 w-72 rounded-full bg-danger-500 opacity-10 blur-3xl"></div> <section className="container mx-auto py-16 px-6 text-center sm:py-40"> <h1 className="mx-auto w-3/4 pb-10 text-4xl font-bold sm:text-5xl"> Next.js Tailwind </h1> <p>A great combination of Next.js and Tailwind.</p> </section> </> ); }; export default Home; - Try
formatandlintcommand to verify if ESLint and Prettier are configured correctlyyarn format yarn lint - Restart dev server to see the result
yarn dev
Install Storybook
When our project grows and we have a lot of components, making sure there’s no duplication becomes harder if we don’t have proper component documentation. Storybook is a library to create component documentation. It can be integrated to project written in many UI libraries and provides useful functionalities.
- Initiate Storybook
npx storybook initWithin this step, Storybook checks project dependencies and decides the best configuration. Also, providing examples of stories.
- Type
yif prompted with the messageNeed to install the following packages: storybook Ok to proceed?. - Type
yif prompted with the messageDo you want to run the 'eslintPlugin' migration on your project?. Within this step, Storybook installs ESLint plugin needed. - Install additional libraries
yarn add -D storybook-addon-next postcss-loader - Configure
.storybook/main.jsconst path = require('path'); module.exports = { // load stories from any directories including MDX files stories: [ './**/*.stories.@(js|jsx|ts|tsx|mdx)',, '../**/*.stories.@(js|jsx|ts|tsx|mdx)', ], addons: [ '@storybook/addon-links', '@storybook/addon-essentials', '@storybook/addon-interactions', 'storybook-addon-next', ], framework: '@storybook/react', core: { builder: '@storybook/builder-webpack5', }, webpackFinal: async (config) => { // use tailwind via postcss-loader config.module.rules.push({ test: /\.css$/, use: ['postcss-loader'], include: path.resolve(__dirname, '../'), }); // define aliases for each directory not provided by Next.js by default config.resolve.alias = { ...config.resolve.alias, components: path.resolve(__dirname, '../components'), }; return config; }, }; - Configure
.storybook/preview.jsimport '../styles/globals.css'; export const parameters = { actions: { argTypesRegex: "^on[A-Z].*" }, controls: { matchers: { color: /(background|color)$/i, date: /Date$/, }, }, viewMode: 'docs', }I personally prefer
docsmode by default because it looks nice :). If canvas mode is preferable, just removeviewMode: 'docs'. - Add these items to
.eslintignore!.storybook .next node_modules - Then, extend
eslint-plugin-storybookin.eslintrc.json{ "extends": [ ... "plugin:storybook/recommended" ], ... } - Create component sample
components/Button/Button.tsximport NextLink from 'next/link'; import { useRouter } from 'next/router'; interface ButtonProps extends React.HTMLProps<HTMLButtonElement> { href?: string; } export default function Button({ children, href, onClick }: ButtonProps) { const router = useRouter(); const linkActive = router.asPath === href; if (href) { return ( <NextLink href={href || '/'}> <a className={`underline decoration-2 underline-offset-2 ${ linkActive ? 'font-bold decoration-red-500' : 'decoration-violet-500' }`} > {children} </a> </NextLink> ); } return ( <button className="rounded-md border-0 bg-violet-500 px-12 py-2 text-base text-white shadow-lg shadow-violet-300 transition hover:bg-violet-600 hover:shadow-violet-400" onClick={onClick} > {children} </button> ); } - Create story sample
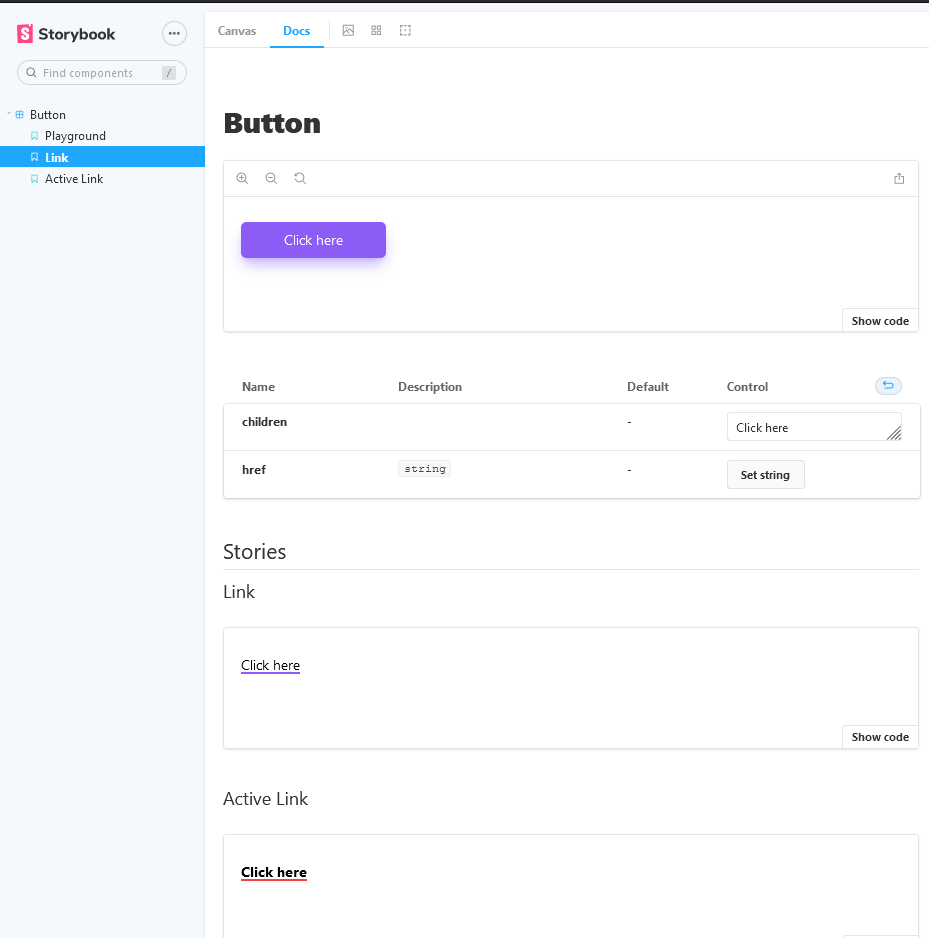
components/Button/Button.stories.tsximport { ComponentMeta, ComponentStory } from '@storybook/react'; import Button from './Button'; export default { title: 'Button', component: Button, } as ComponentMeta<typeof Button>; const Template: ComponentStory<typeof Button> = (args) => <Button {...args} />; export const Playground = Template.bind({}); Playground.args = { children: 'Click here', }; export const Link = Template.bind({}); Link.args = { children: 'Click here', href: '/my-link', }; Link.parameters = { nextRouter: { path: '/', }, }; export const ActiveLink = Template.bind({}); ActiveLink.args = { children: 'Click here', href: '/my-link', }; ActiveLink.parameters = { nextRouter: { asPath: '/my-link', }, };In the example above, we are simulating the router. Visit addon documentation for more capabilities.
- Create
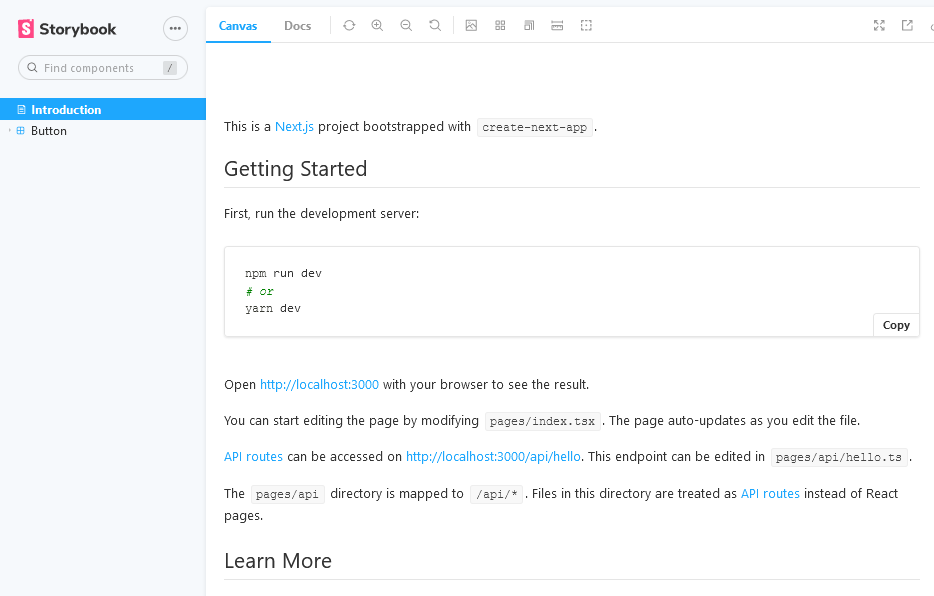
.storybook/Introduction.stories.mdxwhich addREADME.mdas an introduction in the storybookimport { Description, Meta } from '@storybook/addon-docs'; import Readme from '../README.md'; <Meta title="Introduction" /> <Description markdown={Readme} /> - Delete examples from the Storybook which are located in
storiesdirectory. - Try running the storybook
yarn storybookBy default, Storybook runs on
http://localhost:6006.
Congrats! Your web project is ready. Let's build a beautiful web app by adding more components and stories. I also created a project starter based on this article which you can use to speed up the project set-up.